There are many great benefits associated with having a blog, which is why I wanted to share this free step-by-step guide on How To Create A Blog.
I have divided it into 7 simple steps.
This easy-to-follow, step-by-step guide will help you build a professional blog in just 30 minutes, requiring only basic computer skills.
After 7 years of experience and having worked on 200+ websites (blogs), I can assure you that starting a blog can be incredibly easy, even for beginners.
Let’s begin!!
[lwptoc hideItems=”1″]
Step 1: Choose a domain name
No matter what purpose or niche you want to create a blog for, you need to choose a name that will make your blog recognizable and searchable on Google.
In my case, I’ve chosen to use my own name as my blog’s name, “Manipathak.com,” but it’s not necessary to do so. You can select any name and still create a viral blog.
Technically, these names are called domains, and they represent the URL of your blog, which allows people to find it.
It’s difficult to remember the ordinary IP address (numerical strings) for a blog, which is why we use a humanly memorable and appealing name for blogs and websites.
You need to buy a domain name and server for your blog, but it can cost as low as $2.9 per month and is easy to set up.
Domain names always end with an extension such as .com, .in, .us, .net, .org, .info, and others. It’s highly advisable to choose .com, but if it’s not available, you can consider .net or other options.
Here are the necessary factors for a domain name:
- Unique and Memorable: Make it distinct and easy to remember.
- Relevant: Reflect on the content or theme of your website.
- Easy to Spell and Type: Avoid complexity.
- Short and Concise: Keep it brief without sacrificing clarity.
- Appropriate Extension: Choose an extension that suits your purpose (.com, .net or others).
- Avoid Trademark Issues: Ensure no infringement.
I’m sure you are ready to check if your desired name is available. This website to check and purchase your domain name (blog name).
💡 Visit this website — Free domain name with hosting at $2.9/m only.
Don’t worry, even if you skip to the next step. It’s the most important one, and you shouldn’t avoid it.
Step 2: Take your blog online
This is the most important and easy-to-follow step that will assist you in starting a blog and taking it online in less than 5 minutes.
To start your blog, you require two essential components: blog hosting (also referred to as web hosting or server) and blogging software. The great news is that these elements are usually bundled together as a package.
I use WordPress for my personal blog, which is also utilized by big brands like Nike, NASA, and others. You can install this WordPress software on your web hosting.
It’s a simple, automatic, and free way to set up your blog online. However, the most important thing is that you need to acquire blog hosting (with a free domain) before this can happen.
The web host I recommend, and the one I show you how to use in this guide, is BlueHost. I personally use Bluehost and Hostinger. I recommend them for all new bloggers because:
- Free custom domain registration to secure your chosen name.
- 30-day money-back guarantee for your satisfaction.
- Automatic and free installation of WordPress blogging software.
- Reliable web hosting with a strong WordPress recommendation since 2005, hosting over 2 million blogs and websites.
- Accessible 24/7 customer service via phone or web chat.
Click any BlueHost link on this site for a special discount price of $2.75 per month.
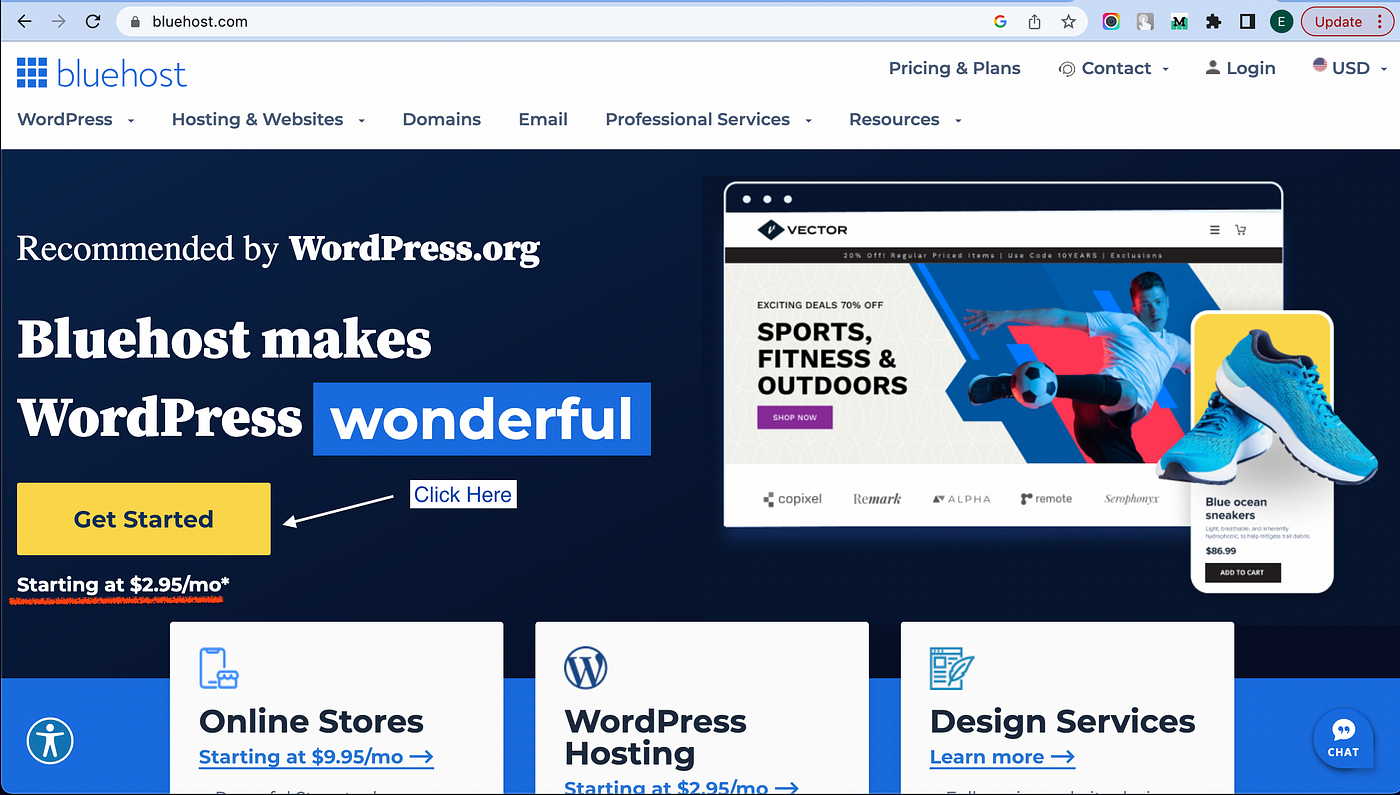
- To access the special rate of $2.75 per month on BlueHost, click here and then select “Get started now”.
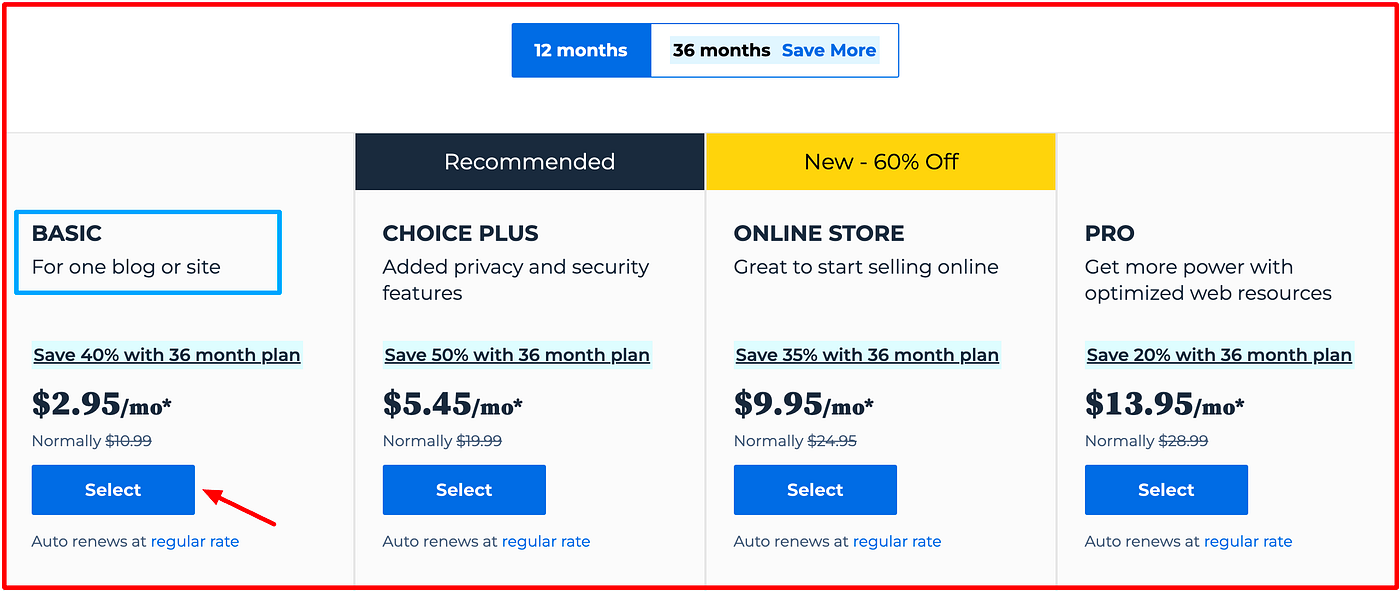
2. Select your preferred plan, although you can start with the “basic” one as shown below in the image.
Though you are free to choose any other plan, it will work perfectly.
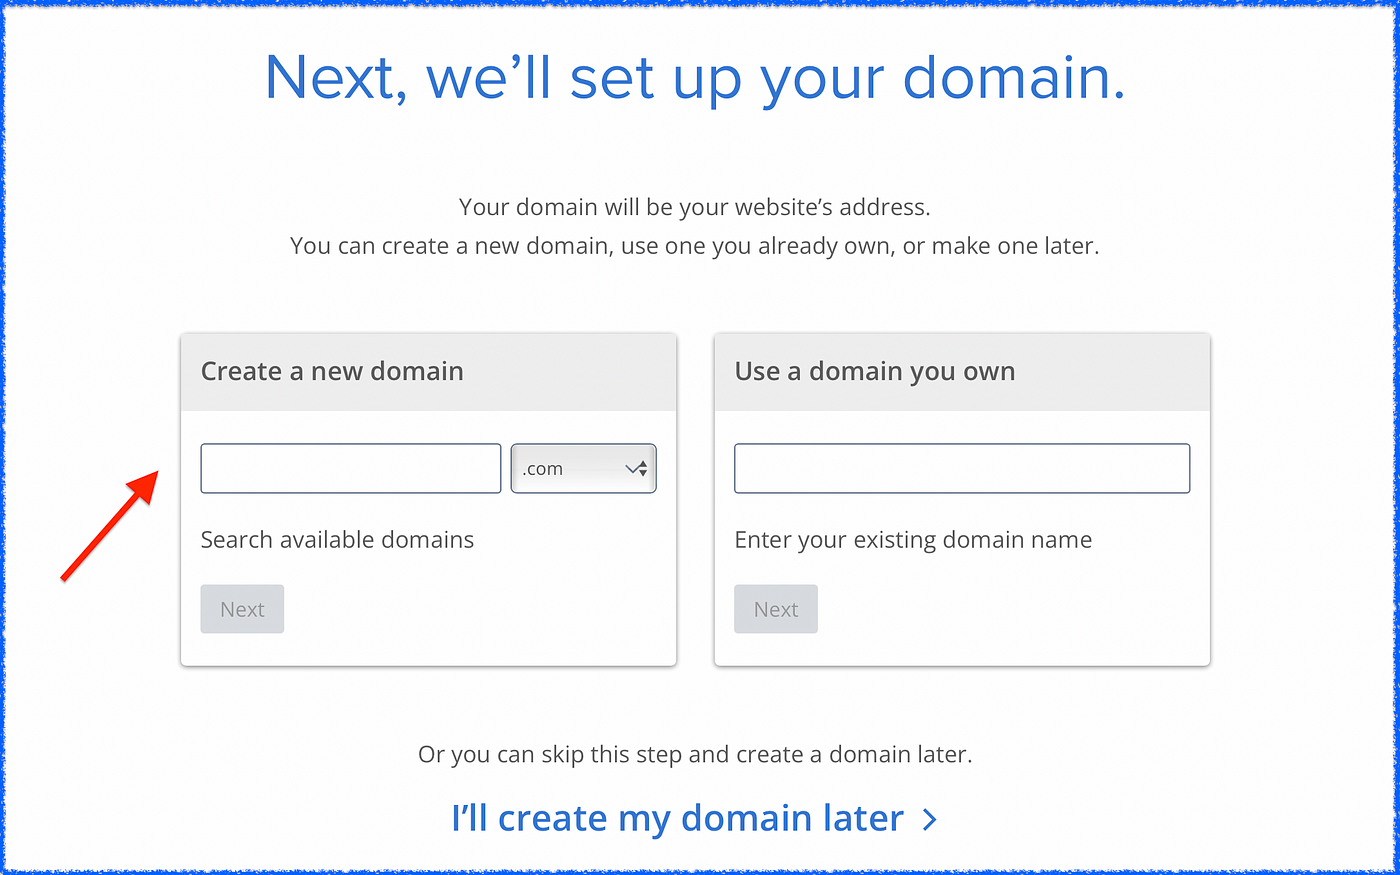
3. Enter your desired domain name for your blog in the left box and click “next” to initiate the registration process at no extra cost.
💡 Note: If you already own a domain name and wish to use it for your blog, enter your existing domain in the right box and then click “next”. Use the right box only if you have previously paid to register a domain!
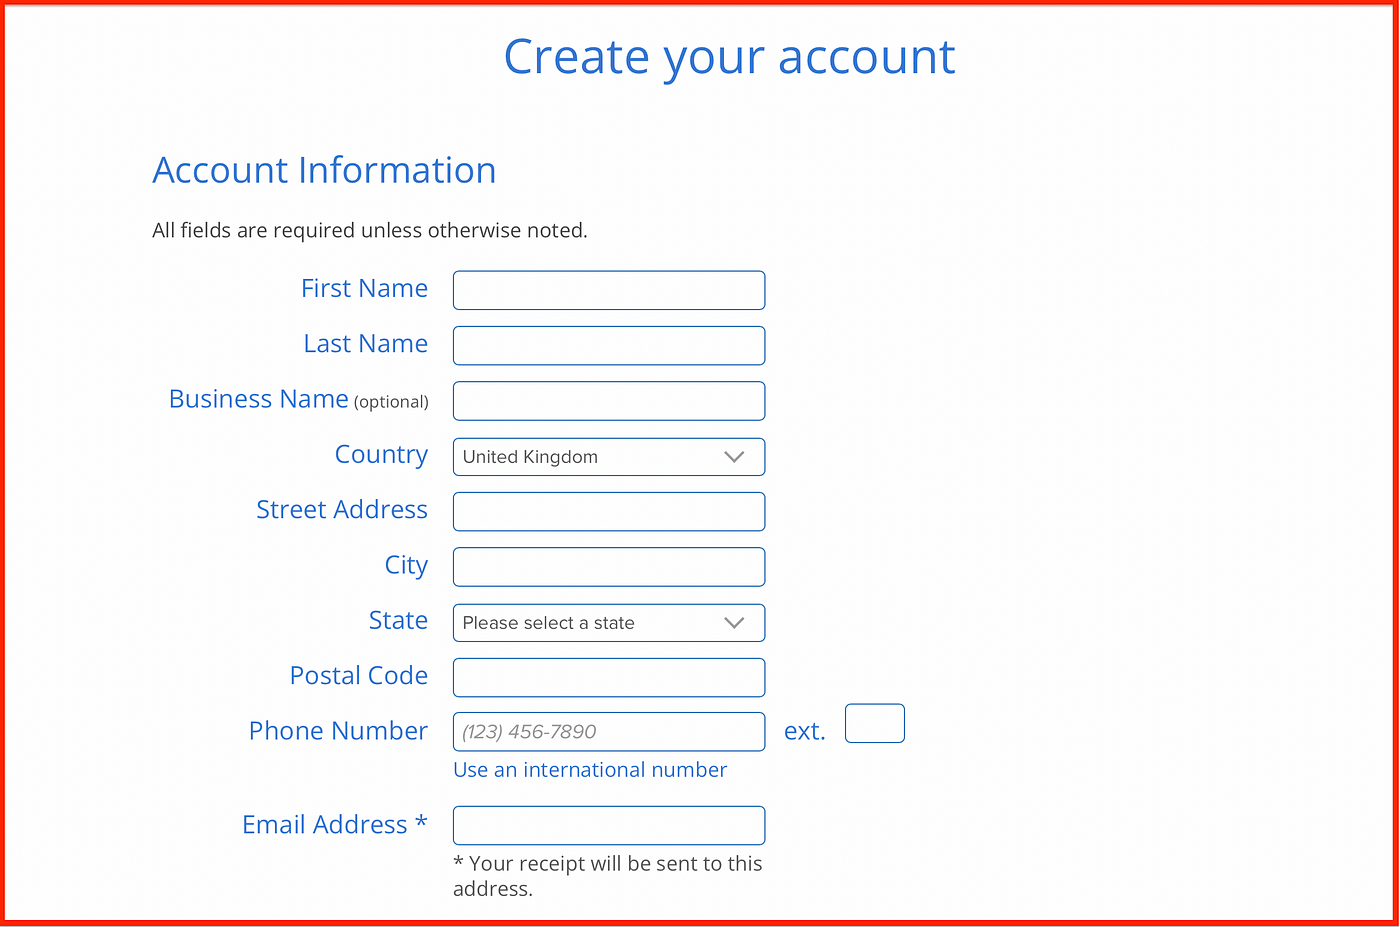
4. Next, you need to fill in some basic details like name, email, and phone number on the registration page.
5. You will also need to choose your hosting package and options.
- BlueHost hosting plans include essential features for blog setup: free custom domain, easy WordPress installation, web hosting, and personalized email (e.g., yourbusiness@yourdomain.com).
Lately, BlueHost has included domain privacy within the hosting plan, ensuring your details remain protected from domain registrars and companies at no additional cost.
It will only cost you $35 per year, as shown in the screenshot below after the discount.
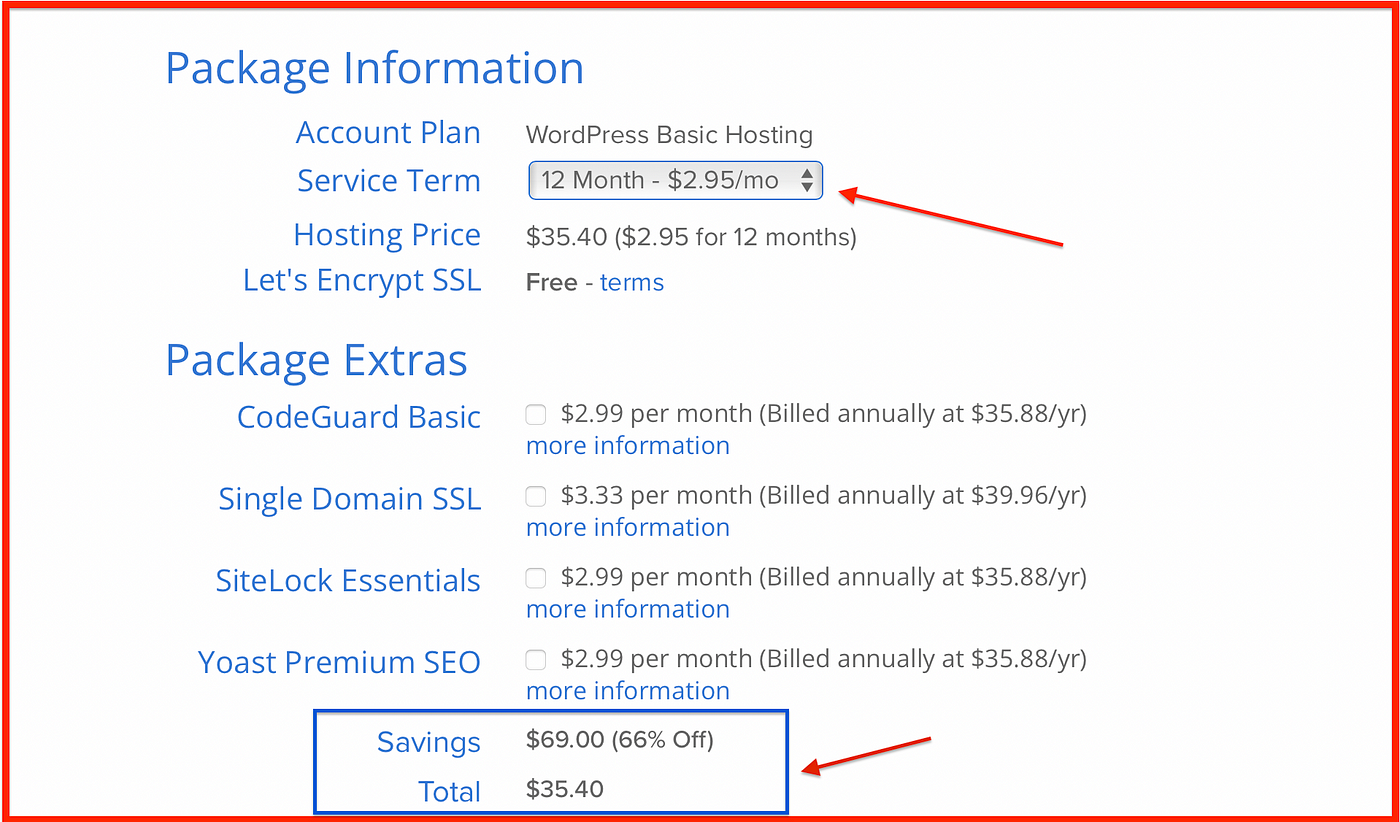
After completing this process and making the purchase using PayPal, credit card, or debit card, your registration will be complete, and a success message will be displayed, similar to the example shown below.
6. Next, you will be prompted to create your BlueHost account and set a password.
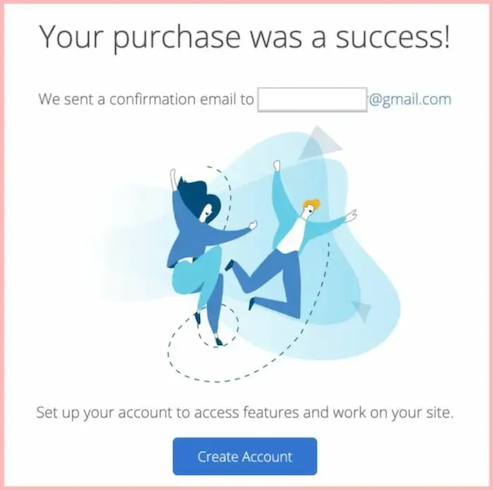
Now, you need to create a username and password. Simply click on ‘Create account’ and proceed with the setup. Once completed, you will be directed to an installation helper.
As you are following this tutorial, you can click ‘Skip this step’ on the subsequent pages to directly access the dashboard.
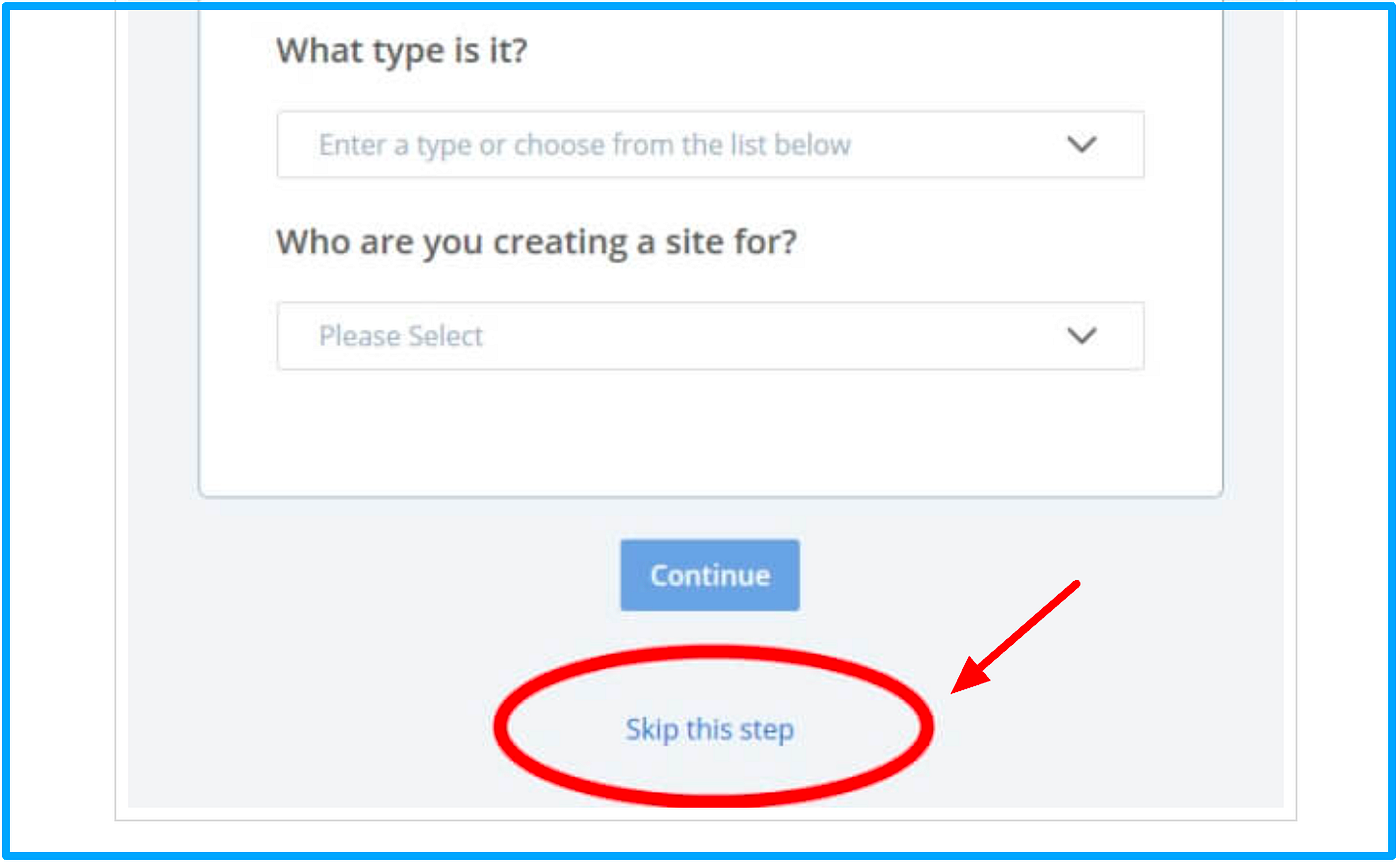
7. Install WordPress Blogging Software Automatically
Here, you will notice that Bluehost, after you click ‘Skip,’ will automatically install WordPress on your Bluehost hosting server and take you to the Bluehost dashboard.
Please be patient as this process may take a few minutes.
Once you are in the Bluehost dashboard, click ‘Login to WordPress’ to access your WordPress blogging software admin panel. From there, you can design your blog, add posts, and manage everything.
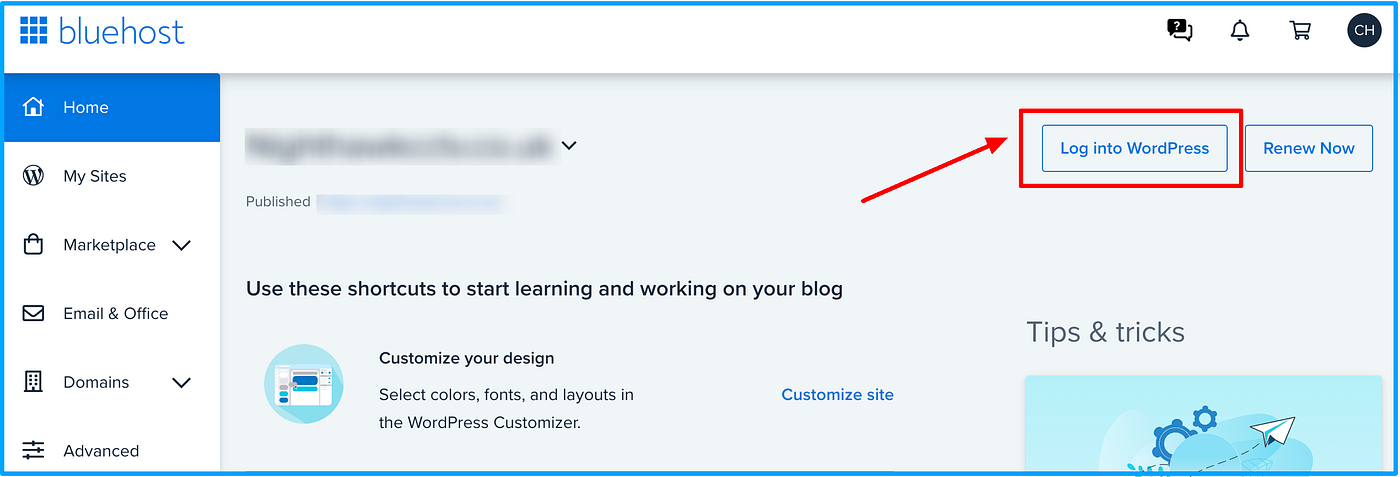
WordPress blog installation complete on Bluehost.
Feel free to contact me in case you fail to install WordPress or get stuck somewhere. I’m happy to provide free assistance.
Step 3: Customize your blog
Previously, we created a Bluehost account, selected a domain name for our blog, and successfully installed WordPress as our blogging platform. I also provided instructions on accessing the WordPress admin panel.
I’m sure your blog is accessible when you enter the domain name in browsers like Chrome or Safari.
💡 Tip: If you want to directly log in to your WordPress admin panel without going through Bluehost after the WP installation, simply follow the format below in any browser. Enter your blog URL and provide the user ID and password you have created.
https://yourblogname.com/wp-admin This is the URL to directly access your WordPress blog's admin panel.Now, it’s time to customize your blog to give it a professional appearance. WordPress is an incredibly user-friendly tool that offers thousands of themes and plugins, allowing you to create various types of websites and blogs without any coding skills or years of experience.
With the right guidance, like this post, you can use themes such as Astra and plugins like Elementor to easily design your blog through drag-and-drop functionality.
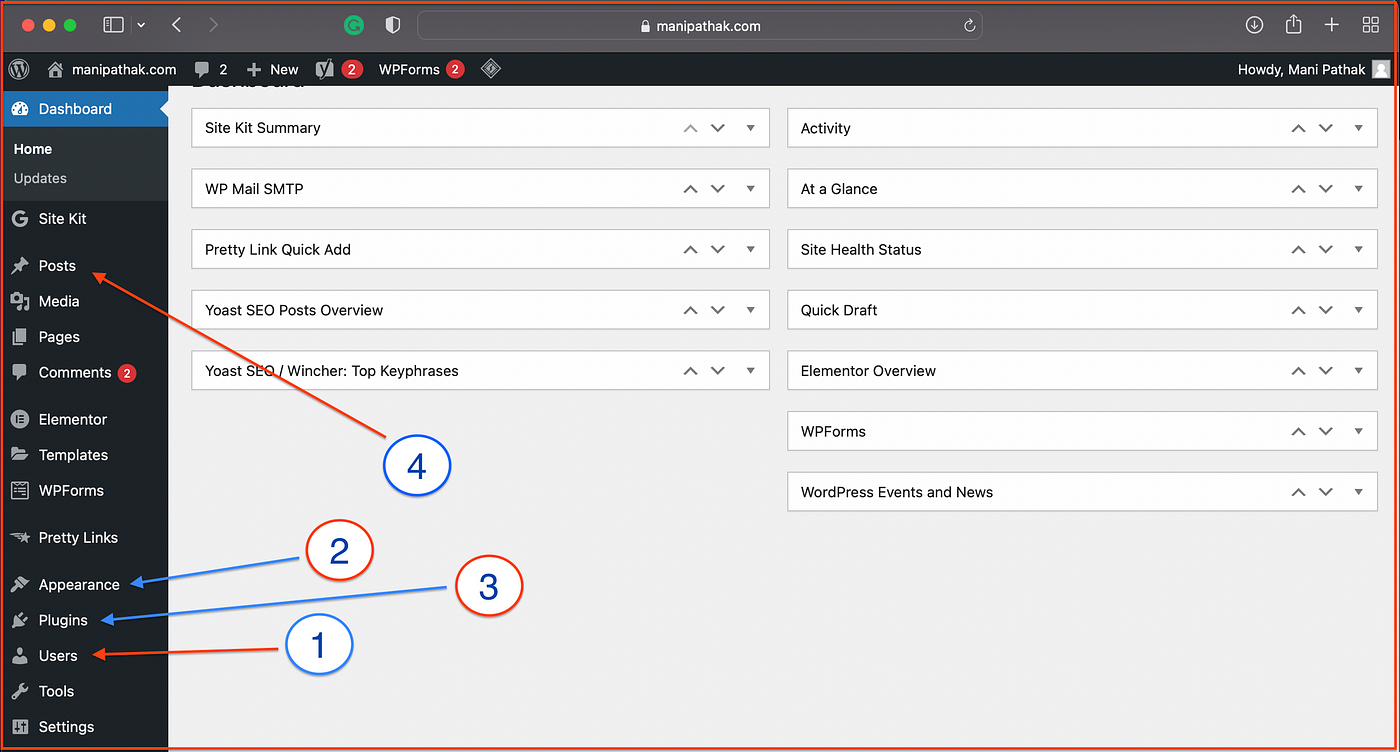
As you can see in the image above, a typical WordPress blog admin panel will look like this. As we discussed earlier, you can access your blog directly through Hostinger or by using the URL I shared above.
However, before writing your first post, it is essential to understand the four elements highlighted in the image. These four aspects will help you grasp the basics and get ready to publish your first blog post in no time.
- User tab — Here you can edit your email password or add more writers and editors to your blog.
- Appearance — Under the Appearance tab, you will find various sub-tabs like theme, menu, and customisation options.
- Plugins — In this tab, you can explore extensions (similar to mobile apps) to add more features to your WordPress blog. The majority of them are free.
- Posts — Under this tab, you can start writing new posts or view all existing blog posts.
Sounds easy. I’m sure you won’t find it difficult.
💡 Tip: When starting a blog and logging in for the first time, make sure to go to the user settings and set up your password so that you don’t have to log in to Hostinger every time.
Before proceeding, it’s important to have a clear understanding of themes and plugins to avoid any confusion.
WordPress Theme And Plugins
A WordPress theme is a group of files that control a WordPress website or blog’s visual appearance, organisational structure, and functional capabilities.
Colours, typefaces, page layouts, and other stylistic features are all under its control. Without knowing any code, using themes makes it simple to change a website’s appearance.
WordPress Plugins:
The functionality of a WordPress site can be increased by installing and activating extra software components known as WordPress plugins.
Specific features and functionalities that are not present in the core WordPress platform are provided by plugins.
They let users to include different features such as contact forms, social media sharing buttons, SEO tools, security upgrades, and more.
How to install a WordPress theme?
To install themes and plugins in your WordPress dashboard, follow the steps outlined in the image above. Here is the path you need to follow:
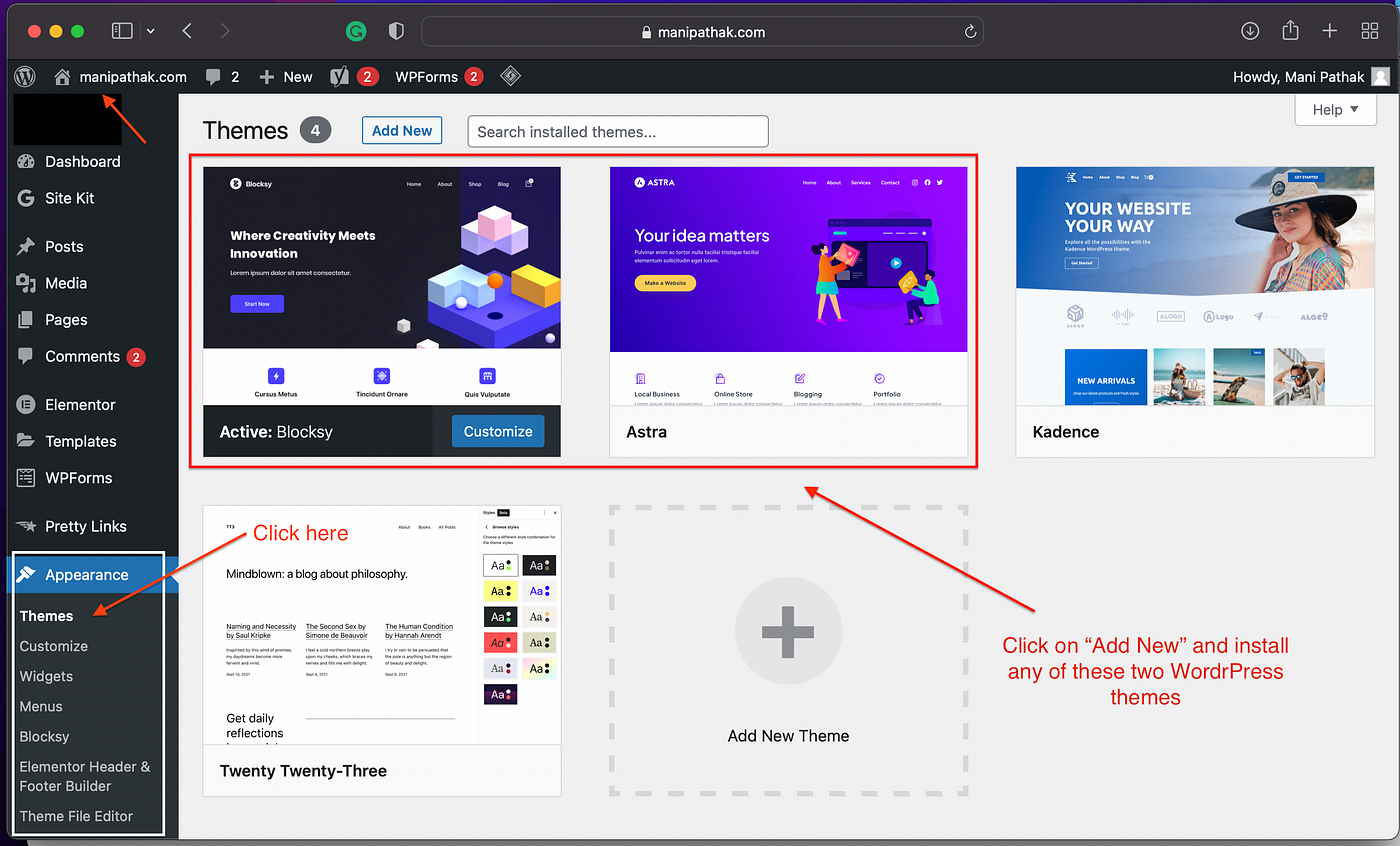
Install WordPress themes and plugins.
- Theme: Go to “Appearance” in your WordPress dashboard and click on “Themes.” From there, you can browse and install new themes or activate a theme you have already installed.
- Plugins: Navigate to “Plugins” in your WordPress dashboard and click on “Add New.” You can then search for plugins by name or functionality. Once you find a plugin you want to install, click on “Install Now” and then activate it.
💡 Tip: You cannot build a WordPress site without themes and plugins, so it’s essential to understand their importance.
Please note that my intention is not to promote specific themes and plugins, nor am I sponsored to do so.
My Recommended Themes and Plugins
To build your blog, it is better to have a theme that loads fast, is SEO-friendly, and offers many features even in the free plan.
With my years of experience, I would like to recommend the following themes and plugins to help you achieve that.
WordPress Themes:
- Astra theme
- Blosky Theme
- Newspaper Theme
- Hello theme By Elementor
- Generatepress Theme
WordPress Plugins:
Plugins are typically chosen based on specific needs and requirements, which is why I’m sharing the best ones based on those criteria.
For designing your blog, you can use the following drag-and-drop plugins:
- Elementor (My favourite)
- Beaver Builder
- Gutenberg editor
- Oxygen
- Divi Page Builder
- Thrive Architect
These plugins provide an intuitive and user-friendly interface for designing your blog, allowing you to create visually appealing layouts without the need for extensive coding knowledge.
For SEO, Security, Forms, and Optimization, I recommend the following plugins:
- Yoast SEO
- Rank Math SEO plugin
- WordFence for Security
- W3 Total Cache
- WP Rocket cache plugin
- WP Forms
- Ninja Forms
Here is a video tutorial to assist you in installing the Astra theme and any other themes you prefer, and guide you through the customization process. You can follow along with the video to easily set up and personalize your WordPress theme to your liking.
Install a theme and customise your WordPress blog.
See, you only wanted to learn how to start a blog, and we have already covered the majority of it in just the last 8 minutes.
If you are following this free guide side by side, it may take more time, but trust me, it’s worth your time and effort.
Your WordPress blog installation is done, customization is done, and now it’s time to figure out all the necessary pages you need.
Necessary pages and elements your blog must have:
Remember, these are essential pages and elements, but you can customize your blog based on your specific needs and preferences.
- About Page: Provide information about you or your blog, including your background, mission, and goals.
- Blog Page: Display a list of your blog posts in reverse chronological order.
- Contact Page: Include your contact information, such as email address, social media links, or a contact form for visitors to reach you.
- Privacy Policy: Outline how you handle user data, privacy, and the use of cookies on your blog, ensuring compliance with regulations.
- Terms and Conditions: Set out the terms of use for your blog, including disclaimers, copyright information, and user responsibilities.
- Disclaimer: Clarify any legal disclaimers, disclosures, or limitations of liability for the content on your blog.
- Navigation Menu: Include a menu that allows visitors to easily navigate through different pages and sections of your blog.
- Social Media Links: Include links to your social media profiles, allowing visitors to connect with you on other platforms.
💡 Remember, having these pages will help you get approval from Google AdSense, make it easier to connect with your users, and ensure a secure website, and with Chat GPT, it is quite easy to write and create these pages now.
When you are learning to start your blog, I’m just trying to provide you with comprehensive guidance to minimize the chances of failure as a blogger.
Don’t mind if this is lengthy content; I want to cover all the necessary information for your success.
Great !! we are now ready to go to the next step.
Step 4: Optimize and secure
Let’s take a real-life example. I have been blogging for myself and managing different websites for nearly 5 years now, including my own blog.
Now, imagine a scenario where a reader visits my website and experiences slow loading times or feels that the site is unsafe.
I will simply lose money on the table, ruin my blog’s reputation, and have no use for all the hard work I put into writing and creating my blog.
That is something you will never like to happen to your blog, which is why optimization and securing your blog is crucial.
This is not a difficult task, though. All you need is an SSL certificate for your site and on-site optimization using plugins like Litespeed, WP Rocket or W3 Total Cache.
Yes, simply install any of the above plugins on your WordPress blog and optimize your website speed, images, CSS, HTML, and JS without writing a single line of code.
Fortunately, when you started creating your blog, SSL was automatically installed on your blog by WordPress.
However, if you encounter any issues, you can reach out to Bluehost support, and they will fix it in seconds.
You can use plugins like WordFence to add extra security and protect your blog from hackers. However, it’s not recommended to have more than 10 plugins installed on your blog.
Keeping the number of plugins to a minimum helps maintain better performance and reduces the risk of conflicts or vulnerabilities. It’s important to choose reliable and trusted plugins that serve essential functions for your blog.
💡 Here we have a video tutorial to optimize your blog for maximum speed and security, which takes less than 20 minutes.
Step 5: Technical setup
This is something I would never want to miss. Before writing my first blog post, I always make sure to prioritize these steps for starting a new blog or website without fail.
Remember, products like Apple’s Mac and smartphones are successful because they have proven to be the best, backed by effective marketing strategies and a positive reputation in the market.
Even if you have excellent marketing efforts, without good branding, packaging, and quality, it will be challenging to sustain sales in the long run.

Image by sentavio on Freepik. Technical setup (Google search console and Google Analytics)
These setups are really important, and you should not ignore them when you are just learning about how to start a blog.
- Get your blog verified on Google Search Console, Bing, and other search engines. WordPress offers a useful plugin called Google Site Kit that simplifies the setup process.
- In addition, set up Google Analytics and other analytics tools to track your website visitors, traffic sources, and other important data. Google Site Kit plugin can also assist you in setting up these analytics tools, but you can also configure them manually if you prefer.
If you fail to verify your new blog with Google Search Console, Bing Webmaster, and other search engines, you won’t receive direct traffic from these search engines. However, you can still rely on social media or build brand value to drive direct traffic to your blog.
Verifying your blog with Google and Bing search engines is crucial as it allows you to analyze and distribute your blog posts, news, and website to your potential clients and readers.
To achieve this effectively, some people opt for SEO (Search Engine Optimization), which helps their blog posts and niche content rank higher in search engine results.
I don’t want to overwhelm you, especially when you’re just starting to learn how to start a blog.
However, if you subscribe to my mailing list, I will provide you with regular high-quality content that leaves no guesswork for you.
Now, we are ready to jump into writing and posting blogs, news, and much more on your newly created blog.
Step 6: How to write great blog content (how to write a blog?)
It’s a joyful moment for me every time I create a new blog and write the first blog post.
I wasn’t always a skilled writer, but over time, I learned how to create great blog posts that convey your intentions to help your readers, solve their problems, and generate income for you.
With years of experience behind me, if I were to start again, I would definitely follow these essential steps when beginning to write and inspire others:
- Research the problem: If you were a doctor, you wouldn’t provide medicine without listening to your patient. Similarly, when you start a blog to address people’s problems, you need to understand exactly what they are facing first. There are many FREE tools like Ahrefs, Google Trends, and Google Keyword Planner that can help you find what your potential readers are searching for on Google and if there are existing videos or articles that offer better solutions.
- Plan the content strategy: Writing a great post requires you to address all the ins and outs of the problem your readers are facing. An expert breaks down the main topic into many subtopics and explains them thoroughly so that even a novice can read and master the subject through that blog post. Develop a content strategy and create an editorial calendar. Outline topics, research, and gather relevant information to ensure your content is valuable and well-structured.
- Focus on quality: Prioritize quality over quantity. Craft well-written, informative, and engaging blog posts that deliver value to your audience. Pay attention to grammar, spelling, and overall readability.
- Use Infographics: Use relevant and eye-catching visuals, such as images, infographics, and videos, to enhance your blog posts and make them more engaging and shareable.
- Consistency (My personal favourite): Pay close attention to consistency (write daily or at least 2 to 4 posts per week). Make sure your content is genuine, authentic (never copied), and empowering.
- The longer, the better — but it’s important to break it up. Including more information and detail enhances the quality of your content.
However, if your paragraphs are too long and dense, visitors may start skimming or even leave your site. Visitors prefer bite-sized information.
Now you are ready to start writing your blog posts with the aim of ranking well, attracting traffic, and generating online income through various means.
To write a blog post on WordPress, follow these steps:
- Log in to your WordPress dashboard.
- Click on “Posts” in the left-hand menu.
- Click on “Add New” to create a new blog post.
- Enter a catchy and descriptive title for your blog post.
- Start writing your content in the main editor area. You can format your text, add headings, and insert media like images and videos.
- Use the toolbar above the editor to style your text, add links, and perform other formatting tasks.
- To add images or other media, click on the “+” icon in the top-left corner of the editor and select the media type you want to insert.
- Use categories and tags to organize your blog posts and make them easily discoverable for your readers.
- Save your draft periodically by clicking on the “Save Draft” button.
- Preview your blog post by clicking on the “Preview” button to see how it will look on your website.
- Once you are satisfied with your blog post, click on the “Publish” button to make it live on your website.
- After publishing, you can share your blog post on social media platforms to attract more readers.
Remember to proofread your content before publishing and optimize it for search engines by including relevant keywords, meta descriptions, and headings.
💡 Regularly updating your blog with fresh and engaging content will help attract and retain your audience.
Up until this point, as a long-term blogger, I have covered everything you need to know about creating a professional and profitable blog.
However, without marketing, all your efforts can quickly fade away. That’s why it’s crucial to understand the next steps in marketing, as they will help you grow your audience, increase your earnings, and build your brand value.
Step 7: Promote And Make Money Blogging
Just like a wise kid from an economically poor family may struggle to succeed compared to a mediocre child born with a silver spoon, your blog can easily get lost among millions of other blog posts if you put in hours of hard work to write but neglect to put it in front of more and more eyeballs.
For a blogger, the internet economy has made it a lot easier to grow your blog audience and generate more orders.
I would love to share my proven strategies that can help you attract more attention, and readers, and reach for your blog.
However, it’s important to test these strategies with the same passion you have for blogging in order to see success. Remember, nothing comes easy in the first attempt, and it won’t work if you take it lightly.
Here we go !!
Promote On Social Media
ChatGPT, Google Bard, DALL-E, Midjourney, and similar AI tools have made it easy to create images, write captions, and find trending hashtags for your social media posts.
Create a profile for your blog on all relevant social media accounts, connect with users, invite them to like, and join popular groups in your niche. Keep engaging and posting on a daily basis to help your blog generate good traffic from social media.
Tools like SocialPilot, SEMrush Auto Scheduler, and others can help you schedule your blog posts to be published on all social media platforms, even when you don’t have time or want to save time.
You can find these 10 Easy Steps for Maximum Traffic through social media marketing quite valuable if you want to master this.
Pinterest, Facebook, Twitter And Instagram are among the most loved platforms when it comes to content marketing though social media.
While Social media marketing is easy and FREE, It takes time to build a great audience base and generate sales or revenue through different monetization options.
That’s why, you should know about “Email Marketing” as well.
2. Email Marketing
I know it’s not possible to have a genuine email list in the beginning, but email marketing is still possible.
There are two easy ways to do so: either collaborate with other writers in your niche to use their email list, or you can collect email addresses in many different ways.
- You can visit different websites in other niches as well as your own topic, collect their email addresses from their websites, and email them.
- You can submit the contact form with your blog post link on various sites.
- Guest posts on websites related to your niche and include your blog link. They will surely send emails to their readers.
- Collaborate with other creators to build a mailing list.
With that being said, you have some sort of idea of where to start your email marketing journey to make your newly created WordPress blog go viral in no time.
However, there are other ways as well to help you market your blog, attract more eyeballs, and build a good reputation.
Yes, I mean YouTube or video creation.
It might sound crazy to you, but did you know that nearly 99 billion people search for or watch YouTube videos every month? Moreover, they often click the links in the description to visit the recommended sites.
That’s why YouTube is a perfect choice to go viral with your blog.
3. Video Content Creation (YouTube, Facebook And Others)
To your surprise, YouTube videos are watched by 58.68% of male and 41.32% of female users across the globe, with nearly 22% of the traffic coming from the US and 6% from India.
According to Similarweb analysis, 31% of YouTube viewers fall within the age group of 25 to 34, and 80% are aged between 18 to 44.
You can’t imagine how much business you can generate and make your blog go viral in the least possible time with the help of creating and publishing videos.
Just create an account on Facebook, YouTube, and other video sharing platforms like Dailymotion and Rumble, and start sharing video content related to your blog posts. Don’t forget to promote your blog within the videos and in the video description.
This will drive organic referral traffic to your website’s blog, and the more people get to know about your blog, the more it will be shared, liked, and your subscriber base will grow.
4. Collaborate with influencers
This is one of the easiest things you can do. If you send requests to 100 YouTubers or blog owners, at least one of them will likely accept to share your video on their channel, publish your article, or send it to their subscribers.
Keep in mind that your blog is new and trying to grow, so you need to take the initiative to reach out, persuade, and provide great value to get shared.
Generally, you can find the email address of YouTube creators for cold emailing on the ‘About Us’ page of their channel, after verifying a captcha, or on the ‘Contact Us’ page of their website.
5. Guest Blogging And Social Bookmarking
You can choose to share your blog on free guest blogging sites like Medium.com, Quora.com, or Tumblr. Alternatively, you can reach out to similar websites in your niche and ask to submit your high-quality, original posts to their blogs, which their users may love to read.
When you submit these posts, make sure to include hyperlinks to other posts from your blog. This way, if a reader wants to read more, they can click the links and visit your newly created blog.
I have a history of consistently attracting 500 to 1000 visitors from my Medium.com blog posts to my own blogging website. This is what you need to learn and try when you are learning how to start a blog. It can be very helpful.
Great! So far, we have learned how to start a blog, how to promote it, and when and how to write your first blog post. I’m sure you have been following along and finding the information useful.
Don’t worry, I will continue to share everything you need to grow your blog, enhance your writing business, and make money. Just subscribe here!
Blogging for beginners may seem difficult, but I have covered every aspect in detail, explaining how to start a blog that can build an audience base, generate revenue, and work towards your goals.
How to Make Money With A Blog?
Whether you want to start a blog with no experience, I’ve left nothing behind in this FREE guide to help you start your blog.
But let’s face it, we all love money, and if our blog can make us more money than we imagine, even while we’re sleeping… what could be better than that?
Starting a blog is similar to starting a new business; it has the same potential for earning money, provided you treat it as a business.
You can monetize your blog through various websites to generate income. Here are a few ways you can make money from your blog:
- Google AdSense (and other ads): Monetize your website by displaying paid ads. When a visitor clicks on these ads, you get paid. Depending on your blog’s category, ad type, and the traffic’s country, you can earn up to $1000 per click.
- Affiliate marketing: If you recommend products or services, people can purchase them through your affiliate links in your posts, and you earn a portion of the sales. It’s a win-win situation for you and your readers, as they don’t incur any extra cost.
- Sponsored posts: Once your blog gains authority and a good number of regular traffic, businesses and entrepreneurs may reach out to you to publish their articles, and you can charge for this service.
- Paid Consulting: You can promote your own products and services on your blog, such as courses, t-shirts, web development, and other services.
- Sell Subscription: If your content is exceptionally good, many readers may be willing to pay a monthly fee to access your articles and support you.
There are many ways to monetize your blog, but it’s essential to have a good amount of traffic, build loyalty, and be honest with your readers.
Subscribe to read more ways here!
Frequently Asked Questions (FAQ)
You may still have a few questions. In that case, you can click on the above subscribe links, and I will reach out to you with new content as soon as possible.
Moreover, I want to address any potential questions you may have after reading this, ensuring that there are no lingering doubts or chances of failure.
Q1. How do bloggers get paid?
Bloggers can earn money through various methods, including displaying ads, engaging in affiliate marketing, publishing sponsored posts, selling products or services, and offering subscriptions or premium content.
To succeed, bloggers should focus on building a loyal audience, providing valuable content, and maintaining transparency and authenticity.
Q2. How do I start a blog for free?
While it only costs $33 per year to start a blog, if you still prefer to find ways to create a free blog, you can set up a blog on BlueHost using my link and the process discussed above. In return, I am happy to reimburse you 50% of your cost within 60 days.
Simply send me an email through my website manipathak.com, and I will reimburse you once the 30-day money-back guarantee period is over. So, essentially, you can start a blog for free (or close to it). $17 is a small amount for anyone to invest in a year.
You can also reach me via email at hello(@)manipathak.com.
Q3. How do I start a blog with no experience?
If you are looking for ‘How do I start a blog with no experience?’, you need to read the 7-step guide I have shared on ‘how to start a blog’ above. It will take less than 30 minutes to set up your profitable blog.
Don’t skip other parts of this post if you are passionate about learning, improving, and making money through blogging.
Q4. How long should blog posts be?
It is believed that a blog post of an average length of 1500 to 2000 words is considered good. However, based on my experience as a blogger, I have found that longer blog posts tend to perform better in terms of ranking on Google.
Google uses an algorithm called E-A-T (Expertise, Authoritativeness, and Trustworthiness) to compare and rank articles. This means that Google wants to see the trustworthiness, expertise, and authority of your blog.
That’s why writing more content that is concise, clear, and engaging can lead to longer audience engagement on your blog, ultimately improving its performance and ranking.
That’s the reason why I’m writing this extensive tutorial on “how to create a blog?” It spans several hours of effort and is approximately 7000 words long.
The purpose is to achieve a high ranking on Google, enabling me to reach and assist a larger audience worldwide who are searching for this information.
Q5. How much does it cost to create a blog?
With immense joy and a vision to assist you in starting your blog, I can confidently say that you don’t need an expensive plan or course to create your own blog.
Simply follow the guide mentioned above, and all you need is a hosting plan(BlueHost) that costs only $2.95 per month. With this affordable option, you can build your blog of any kind in less than 30 minutes.
Bluehost is the company that allows you to build your blog for as little as $2.95, and they have helped hundreds of beginners like you. If you ever feel stuck, don’t hesitate to message me.
— — — — — — — — — — — –
If you have more questions, feel free to ask them in the comments below, and I will continue to add answers as soon as I see people asking and struggling to build their blogs.
Now, let’s dive into the long-awaited conclusion that will provide a clear idea and actionable vision for your blogging journey.
I will also share my own example to inspire you to achieve success.
The Bottom-line
I must admit that blogging is not only meant for those who want to make money online, but it can also be a great way to reach a larger audience, establish your name in the writing industry, explore book writing opportunities, build an audience, grow your brand, and generate leads.
Whether you are a student, teacher, homemaker, lawyer, entrepreneur, or anyone else in this internet-driven economy, AI and blogging have the potential to revolutionize your world in the coming years.
You can document your journey, connect with like-minded individuals, and achieve more than you can imagine.
That’s why your effort to learn from this step-by-step guide on how to create a blog is worth more than what you initially expected.
Trust me, it only costs $2.9/month or $33 per year after the discount. Follow the tutorial I have shared above, visit BlueHost, and set up your blog today.
Please don’t forget to clap, follow, and share this post to help others in your friends and family circle.
Sharing it on your Facebook, Instagram, and WhatsApp groups will undoubtedly assist me, and your efforts will also pay off in the same way for your good work.
It’s time to take a leave, thanks for your valuable time.
Mani Pathak || Subscribe !!


Vhat can I do?
I want to work
Sure, Email me at hello@manipathak.com
among them acquired “Moral
monuments related to deep
Thanks for the reply and acknowledgment!
commonly associated with